Showing posts with label DIY. Show all posts

Monday, October 14, 2013

Dresser Make Over $60

I have been wanting a dresser to use as an entertainment center for awhile now. That side of the living room as always seemed a little bare to me. Since we spend a lot of time looking in that direction I wanted to warm it up a little.

My idea dresser would be a French Providential with curvy lines but I am on a tight budget and those have been hard for me to find. I kept my eyes open and ran across this one at a garage sale.

  
I paid $45 dollars for it. It does have all the handles I had just removed this one already. It isn't exactly what I wanted but it's well made and I think I can make her work. 

This is my entertainment area now.


I have to say its my least favorite area in my living room. Sorry for the bad lighting, it was cloudy all weekend and hard for me to get some good natural light to take pictures with.

I got started...

Painting I chose to make her two tone, a light beige in the outside with a lighter white drawer facing. I usually use Behr paint with primer when I do furniture but this time I used Olympic I have to say I don't like it as much...it gave me a little trouble.

I also wanted fancy hardware to totally change the look but couldn't find anything to fit so I decided to add a little detail and paint the ones I had.


I went with gold.


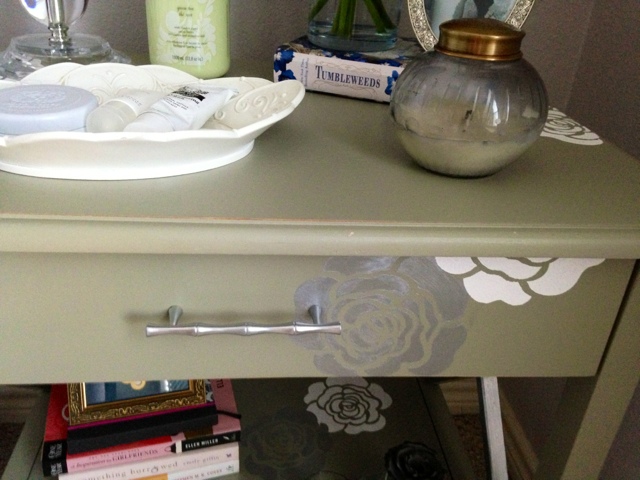
I added this stencil under the handle to give it a little more interest.


And here she is


Can you see the two colors? 

It's hard to see in pictures.


And here is where I put her.


I like it much better. I also can conceal the wires and movies very nicely to keep a nice clean look. 


I have an idea for how I want to decorate the wall above I will show you soon!!

Here's another before and after:


What do you think? All together supplies and everything I came in under $65 so I am happy!

Hope you have a good week!

Monday, September 30, 2013

Cubicles Suck... A Makeover

So it's been a hectic and emotional week. I am finally starting to feel myself again after an emotional job change. Change is good but I often fear it.

I arrived to my new job on Monday to see this.


This may look normal to some people but for me this is about as depressing as it gets. I am someone who is very effected by my environment, i love the outdoors and I also need windows and natural light.

So needless to say when you drive an hour to get to work ... You need a place to welcome and inspire you and this wasn't working for me so...

I decided I could cry about it or I could change it.
( I am pretty sure this is a quote from Pinterest )

Here is the After


I still have a little to do but I am feeling much better about my little corner if the world.

I hope you have a great week!

Monday, August 5, 2013

Finally a New Nightstand


I have been wanting a new nightstand for a really long time, I am actually embarrassed by the one I still had.


It was a keep it real one from almost college days. Well it finally broke and was basically balanceing against the wall for a couple weeks...classy!

I am a big fan of a manly nightstand on his side and a super feminine one on my side. I really love those mirrored ones you see everywhere but my budget wouldn't allow...so I went on the hunt. I wanted to keep it under 80 bucks. I also wanted it to be bigger and to have some extra storage.

I found this...

Half off at World Market ...yay! www.worldmarket.com


But I wanted it to have a little more glam and be just a touch more feminine for my side ;) so here we go...


I got a stencil and some paint and went to work. (Stencil from Michaels www.michaels.com


Make sure to use a glue stick on your stencil so it doesn't slide while you paint.


I also removed the handle and sprayed it metallic for a little more bling.


I painted the sides for a little something extra. This part was tricky and  I only had metallic spray paint so I sprayed it into a plastic dish that way I could paint it on. (spraying it on would have been way too messy)


Had to go fast it dried quickly.


Ta Da....a little more fancy!

Some detail shots...


And here she is all dressed up and settled in her new home.


Lets see the before again...


Now...


Much better!


Still not sure how I want the bottom. I have all this new space and nothing to fill it with. I am a one in, one out kind of person so I will have to find something.


I would also like some kind of cute old clock for her. It was a fun redo and in budget and it looks more green in these pictures but its really more blue gray. I love it and love the extra space ...my own little fancy side of the bed.

One more at night


Happy Monday!
Don't forget to enter your email below to follow upcoming posts, also I would love to hear your comments!